This item has been sold, but you can get on the Waitlist to be notified if another example becomes available, or purchase a digital scan.
1944 Navy Education Services Map of World War II Battle Fronts (Full Set)
NavWarMapSet-navy-1944$2,500.00


Title
NavWarMap No. 1 The Mediterranean. / NavWarMap No. 2 The South China Sea Area. / NavWarMap No. 3 World War 2 in the North Sea Area. / NavWarMap No. 4 The North Pacific Area. / NavWarMap No. 5. Southwest Pacific. / NavWarMap No. 6 We Fight a Global War.
1944 (dated) 38.75 x 58.5 in (98.425 x 148.59 cm)
1944 (dated) 38.75 x 58.5 in (98.425 x 148.59 cm)
Description
This is a full set of all six 1944 Navy Department pictorial maps of the worldwide battlefronts during World War II.
The NavWarMap Series
The NavWarMap series is a series of six maps created by the Bureau of Naval Personnel, part of the Navy Department, and distributed by the Educational Services Section of the Bureau of Naval Personnel. It is unclear exactly what the duties of the Educational Services Section entailed, but we believe these maps were created to educate and train naval and marine personnel. The Navy believed well educated men became more effective sailors and marines. These maps were printed in both single- and double-sided versions. We have been unable to ascertain why both versions were printed. The set includes:- NavWarMap No. 1 The Mediterranean
- NavWarMap No. 2 The South China Sea Area
- NavWarMap No. 3 World War II in the North Sea Area
- NavWarMap No. 4 The North Pacific Area
- NavWarMap No. 5 Southwest Pacific
- NavWarMap No. 6 We Fight a Global War
NavWarMap No. 1 The Mediterranean
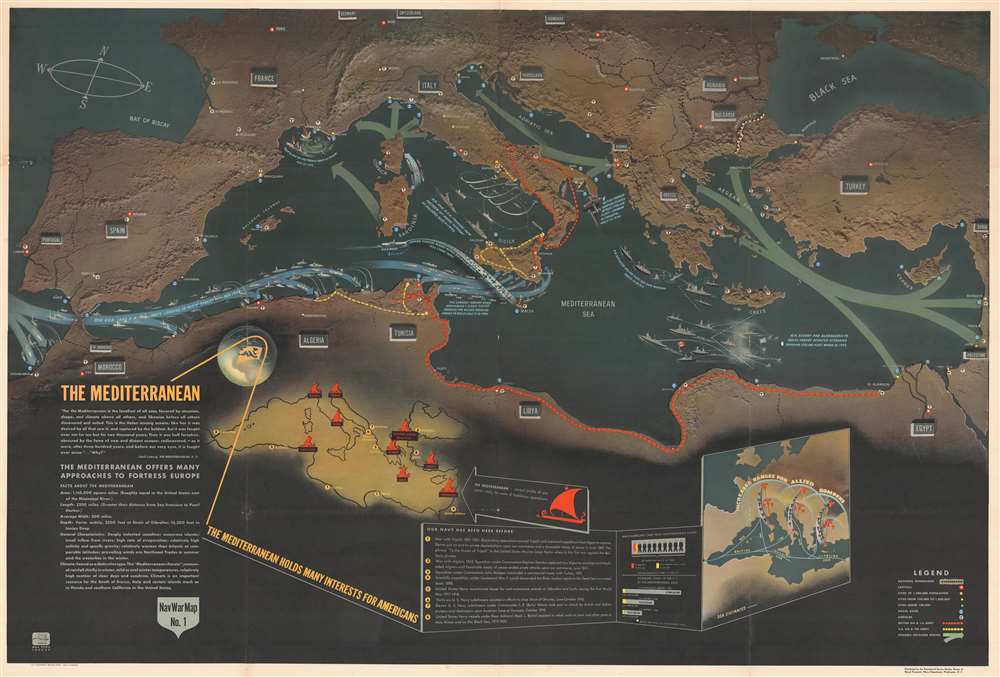
NavWar Map No. 1 is a pictorial map of the Mediterranean region. The map depicts the region from the Atlantic Ocean and Portugal to the eastern Mediterranean Sea, including Syria, Lebanon, Palestine, and the Red Sea and from the English Channel, Germany and Switzerland to the North African coast. Highly detailed and visually stunning, this NavWarMap effectively summarizes Allied operations in the Mediterranean theater through the September 1943 Allied invasion of Italy.An Overview of the War in the Mediterranean
Full of information about combat actions throughout the Mediterranean, crucial details about the course of hostilities in the region are included here. Before Operation Torch, the Allied invasion of North Africa, the most important battles were fought the skies over Malta. Then a British colony, German and Italian forces laid siege to Malta, because, as Rommel accurately stated, 'without Malta the Axis will end by losing control of North Africa.' Churchill referred to the island as an 'unsinkable aircraft carrier' which was resupplied with fighter aircraft twice by the U.S.S. Wasp, an American aircraft carrier (instead of the three times stated on the map). Operation Torch, the Allied amphibious landings in North Africa, were the first major operation in which American forces participated. The allies landed over 100,000 troops to take on Vichy French forces in Morocco and Algeria, while Field Marshal Bernard Montgomery, commander of the British 8th Army, continued to pursue Erwin Rommel and the Afrika Korps from Egypt through Libya into Tunisia, where American troops linked up with Montgomery. Nazi Germany reacted strongly to the Allied invasion, and invaded Unoccupied France the following day, which led to the scuttling of the French Navy at Toulon, noted on the map.
The next Allied operation, which is also illustrated here, was Operation Husky, the Allied invasion of Sicily. The invasion fleet was the largest ever assembled, over 2,000 vessels. This record would not last a year, as the Allied invasion of Normandy would bring together an even larger fleet. Following the successful campaign in Sicily, the Allies invaded southern Italy, also noted here. The Allied force landed at Salerno, with smaller landings in Calabria and Taranto.A Closer Look at the Map
As stated above, numerous engagements throughout the Mediterranean theater are illustrated, including the Allied invasions of North Africa (Operation Torch) and Sicily (Operation Husky). Countries in southern Europe, the Middle East, and North Africa are labeled, along with their capitals and other large cities. Naval bases and air fields are indicated by different symbols, along with the routes of the British 8th and 1st Army (in red) and the U.S. 5th and 7th Army (in yellow). General information about the Mediterranean region is situated on the left. This information was included because the Navy education sections believed that troops that understand the greater context of why they are fighting are better soldiers. To that end, a brief history of American military involvement in the Mediterranean is also included, along with the locations of ancient sea powers, such as Phoenicia, Rome, Athens, Crete, and Carthage, and the more recent sea powers Genoa and Venice.
NavWarMap No. 2 The South China Sea Area
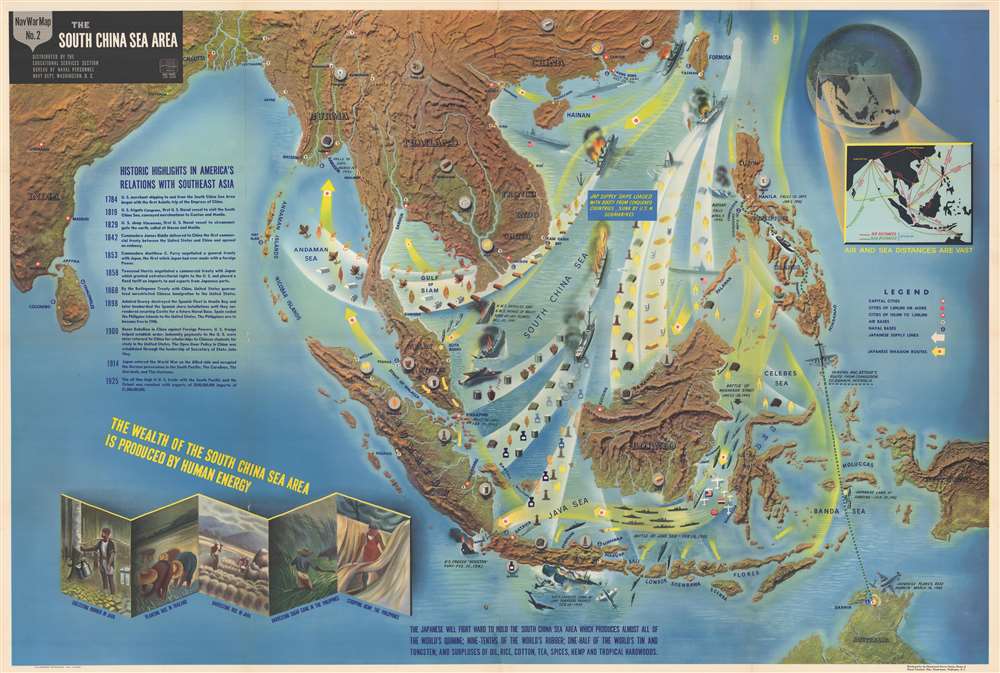
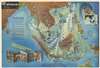
NavWarMap No. 2 is a pictorial map of Southeast Asia. Depicting the region from India to the Pacific Ocean and from China to Java, New Guinea and northern Australia, this NavWarMap provides a visually enthralling overview of the beginning of World War II in Southeast Asia.The beginning of World War II in the Pacific
A part of the world rich in natural resources, Southeast Asia was a target ripe for invasion by the Imperial Japanese. Per the map, 'the South China Sea Area…produces almost all of the world's quinine; nine-tenths of the world's rubber; one-half of the world's tin and tungsten; and surpluses of oil, rice, cotton, tea, spices, hemp, and tropical hardwoods.' One of the major difficulties faced by the Japanese during World War II was the nearly complete lack of natural resources on their home islands. In order to prosecute the war, which the Imperial Japanese believed was their right, these resources were a necessity. Japanese forces began attacks in the region on December 8, 1941, the same day as the surprise attack on Pearl Harbor. Quick, systematic victories followed, mostly because British and American forces in Southeast Asia underestimated the capability and the zeal of their enemy. Until the beginning of the Guadalcanal Campaign in the Solomon Islands in August 1942, the Japanese military scored victory after victory in Southeast Asia and stood nearly unopposed.A Closer Look at the Map Itself
The progression of Japanese troops throughout the region is easily traced, with yellow arrows indicating routes of the Japanese advance, with white arrows illustrating which resources they extracted from the territories they conquered. Specific events, such as the fall of Manila, Corregidor, and Bataan in the Philippines, and the sinking of the H.M.S. Repulse and the H.M.S. Prince of Wales are illustrated, labeled, and dated. General Douglas MacArthur's escape from the fortress on Corregidor is highlighted, with the map illustrating his route to Darwin, Australia in order to continue to command Allied troops in the Southwest Pacific after the fall of the Philippines. Airfields and naval bases are indicated throughout the region, along with capitals and other cities. An inset map of the region on the upper right provides both air and sea distances between cities in the region, allowing the viewer to better comprehend just how much area of the world this theater covered. 'Historic highlights' of America's involvement in Asia are provided along the left, along with sketches of indigenous people gathering 'the wealth of the South China Sea Area'.
NavWarMap No. 3 World War II in the North Sea Area
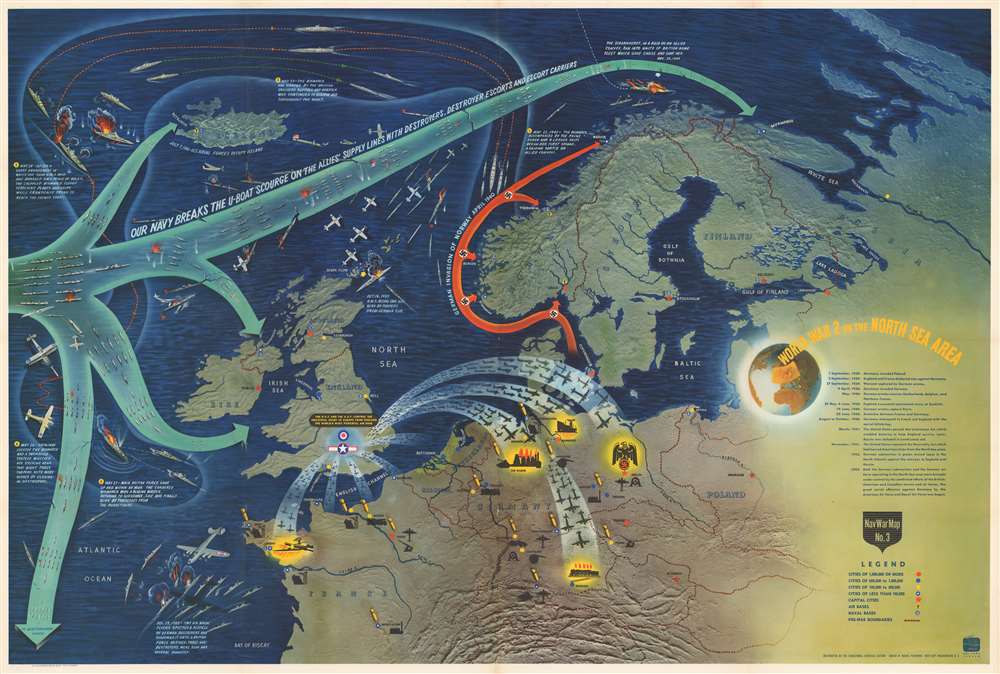
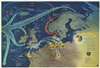
NavWarMap No. 3 is a pictorial map of of northwestern Europe and the North Atlantic. The map depicts the region from the Atlantic Ocean to Russia and from the Arctic Ocean to central France and Switzerland. Illustrating two crucial aspects of the war in Europe, the Battle of the Atlantic and the Allied strategic bombing campaign of targets in France and Germany, a clear portrait of the current state of the war in Europe is painted here.The Battle of the Atlantic
Winston Churchill, the British Prime Minister during World War II, claimed that the only part of the war that ever truly frightened him was the 'U-boat peril'. As the war in continental Europe raged, Britain was fighting for its very survival in the Atlantic. Churchill believed that Germany's best hope of winning the war was through destruction of Allied shipping. Between the fall of France in June 1940 and the end of that year, German U-boats, mines, and aircraft succeeded in sinking three million tons of Allied shipping. If Britain had been cut off from the rest of the world by Hitler's 'wolfpacks', the war surely would have been lost. Through Allied persistence and commitment, along with new technology, tactics, and intelligence efforts, the effectiveness of German U-boats gradually waned. The Battle of the Atlantic was never truly 'won' by either side and it was one of the longest campaigns in the war. Between 75,000 and 85,000 Allied seamen perished while ferrying supplies across the Atlantic.Strategic Bombing in Europe
The tactic of strategic bombing was practiced by both Allied and Axis forces during World War II, and not only in Europe. Japanese forces mercilessly bombed targets in China and elsewhere during the Pacific War, while the Americans firebombed many Japanese cities once they had conquered islands in the Pacific that made bombing Japan possible. By using air power to destroy enemy targets, both sides believed that this practice would damage, at least to some degree, the enemy's ability to prosecute the war or produce war materials. Raids on both military and industrial targets were organized by both sides, along with missions that specifically targeted civilian populations in an effort to terrorize them and disrupt their usual activities.A Closer Look at the Map Itself
Elements of both the Battle of the Atlantic and the Allied strategic bombing campaigns are illustrated here. Large, light blue arrows spread across the Atlantic, allowing the viewer to better grasp how far Allied convoys traveled, particularly as they broke 'the U-boat scourge on the Allies' supply lines'. Five numbered captions trace one of the most talked about events of the Battle of the Atlantic, the sinking of the Bismarck. The Bismarck, and her sister ship the Tirpitz, were the largest battleships in the German navy, and, consequently, the largest battleships built in Europe. If she had been able to safely reach the Atlantic, the destruction wrought upon Allied convoys would have been disastrous. However, through friendly forces in the Swedish Navy, British military officials were alerted that the Bismarck was heading for the Atlantic, a fact which was supported by radio intercepts from Bletchly Park. After a series of engagements across the north Atlantic, the Bismarck succumbed to British torpedoes.
As for the Allied strategic bombing campaign, R.A.F. and U.S.A.A.F. forces are illustrated bombing targets in the French cities of Brest, Lorient, Rouen, Le Havre, and Paris, along with German targets in the industry-rich region of the Ruhr Valley, Hamburg, and Berlin itself, labeled with a Nazi eagle holding a blood-red swastika.
NavWarMap No. 4 The North Pacific Area
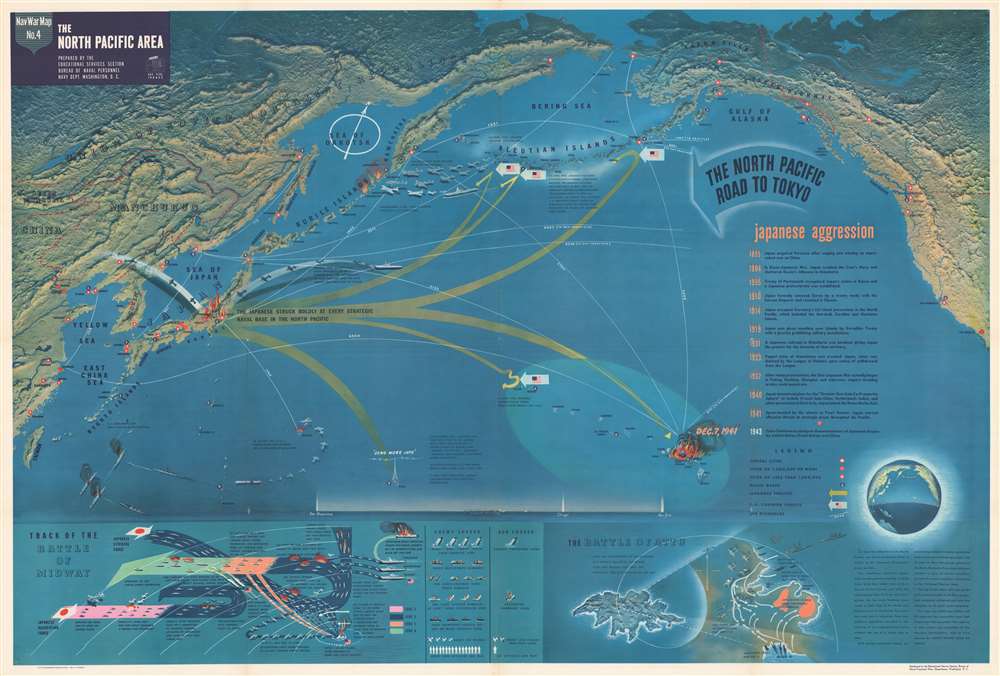
NavWarMap No. 4 presents in startling color and clarity the events of World War II in the Northern Pacific through the beginning of 1944. Japan's organized offensives across the Pacific spread out like the arms of an octopus and score victories at Pearl Harbor and Wake Island. Pearl is illustrated in flames, and Wake, which valiantly held out against an overwhelming assault as long as they could, is marked by a radio tower stating, 'Send More Japs!' The Japanese were not universally successful, however, since their forces were turned back at Dutch Harbor, evicted from Attu, and abandoned their gains on Kiska. Doolittle's famous raid on Japan in B-25s launched from the U.S.S. Hornet is illustrated, as are American raids on Wake Island and Marcus Island and their continual submarine attacks on Japanese shipping. A chronology detailing Japanese aggression, from their annexation of Formosa (Taiwan) following an 'unprovoked' war with China in 1895 through the Russo-Japanese War and the outbreak of the Second Sino-Japanese War to the multi-pronged assault on December 7/8, 1941, is included on the right.The Battle of Midway
The Battle of Midway is remembered as one of the turning points in the Pacific. The battle, which took place on June 4 – 7, 1942, is summarized graphically in an inset situated in the lower left corner. The battle was planned by the Japanese as a trap for the American aircraft carriers, which would hopefully destroy all of them, and leave Japan free to dominate the Pacific. Unfortunately for the Japanese, American cryptographers had broken their code (which was not public knowledge when this map was published) and the U.S. Navy laid a trap of their own. In one of the world's most decisive naval battles, U.S. Navy aircraft launched from three aircraft carriers successfully sank four Japanese aircraft carriers and destroyed over 300 enemy planes. These losses, combined with those suffered by the Japanese during the Guadalcanal campaign, were irreplaceable. Unlike the U.S., the Japanese did not have the capacity to train the highly skilled pilots and mechanics lost during these campaigns, or to build enough new carriers. Midway, in the opinion of military historian John Keegan, is 'the most stunning and decisive blow in the history of naval warfare'.The Battle of Attu
One of the many aspects of World War II that has been lost in popular memory is that the Japanese did occupy American soil during the war. While the U.S. Navy was winning a decisive victory at Midway, a Japanese landing force landed on and occupied the islands of Attu and Kiska in the Aleutian Islands on June 6-7, 1942. The operation was hoped to distract the Americans from defending Midway (obviously not what happened), but the Japanese construction of fortifications and air bases on the two islands immediately worried American officials. It would not be until May 1943 that American forces were capable of landing on Attu, the furthest of the two islands, which is the operation detailed in the inset on the lower right. 15,000 Americans landed at Attu and fought an occupying force of 2,900 determined Japanese soldiers from May 11 until May 30, when Attu was declared secure. As is noted here, the occupation force on Kiska abandoned the island before American troops landed there.
NavWarMap No. 5 Southwest Pacific
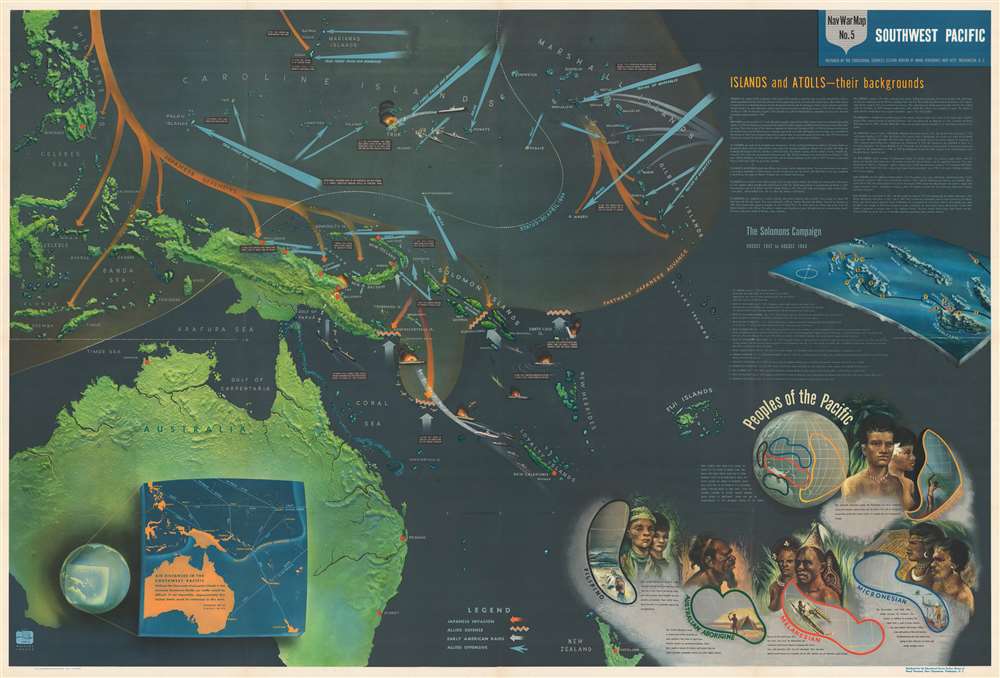
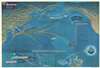
NavWarMap No. 5 is a pictorial wall map of the Southwest Pacific. A critical theater in the Pacific War, the map depicts the region from Celebes in Indonesia to the Marshall and Gilbert Islands and from the Philippines and the Marianas Islands to New Zealand.Understanding the Map Itself
The central map follows events in the Pacific War that take place over a period of more than two years. The orange arrows follow the Imperial Japanese offensive south that began in December 1941 – January 1942 through the Philippines, Indonesia, and New Guinea to the Solomon Islands and Guadalcanal, where the United States undertakes their first offensive of the war. While the invasion of Guadalcanal is not marked by a specific date and text box, a large blue arrow marks the American landing and the crooked yellow line marks the staunch Allied defense of the island that lasted for months. Other blue arrows indicate areas of successive Allied raids and landings. Some of these, such as raids against Truk and Guam and the landings on Tarawa and in the Marshalls, are supplemented with small text boxes. An area of light orange illustrates the furthest reach of the Japanese advance in the South Pacific, while a white dotted line helps viewers visualize the progress the Allies had made from the beginning of the war until the end of April 1944. An inset in the lower left corner provides some context as well, informing viewers that 'approximately five United States could be contained' in the area depicted on the map.An Exploration of the Rest of the Content
Aside from the central map that focuses on the geography of the events of the Pacific War in the Southwest Pacific, the map's creators included amazing supplementary educational content about the area. Short descriptions of twelve different islands and atolls are situated below the title and provide the viewer with short summaries of each one's 'history of discovery', climate, and appearance, including New Guinea, the Gilbert Islands, and the Marshall Islands, which had already been taken, or were actively being fought over, when this map was published. Others, such as the Marianas and the Philippines, would become battlegrounds before 1944 was over. Below these summaries sits a chronological history of the Solomons Campaign, which everyone looking at this piece in 1944 would have been at least slightly familiar with due to the campaign's importance. Thirteen different actions, both naval battles and land assaults, are recounted, with each one numerically identified on the corresponding map. Then, in the lower right quadrant, pseudo-ethnographic sketches of the 'peoples of the Pacific' are included. These are present likely to prepare service members for their inevitable encounters with them, and perhaps even to help them understand that not all the peoples of the region are the same.
NavWarMap No. 6 We Fight a Global War
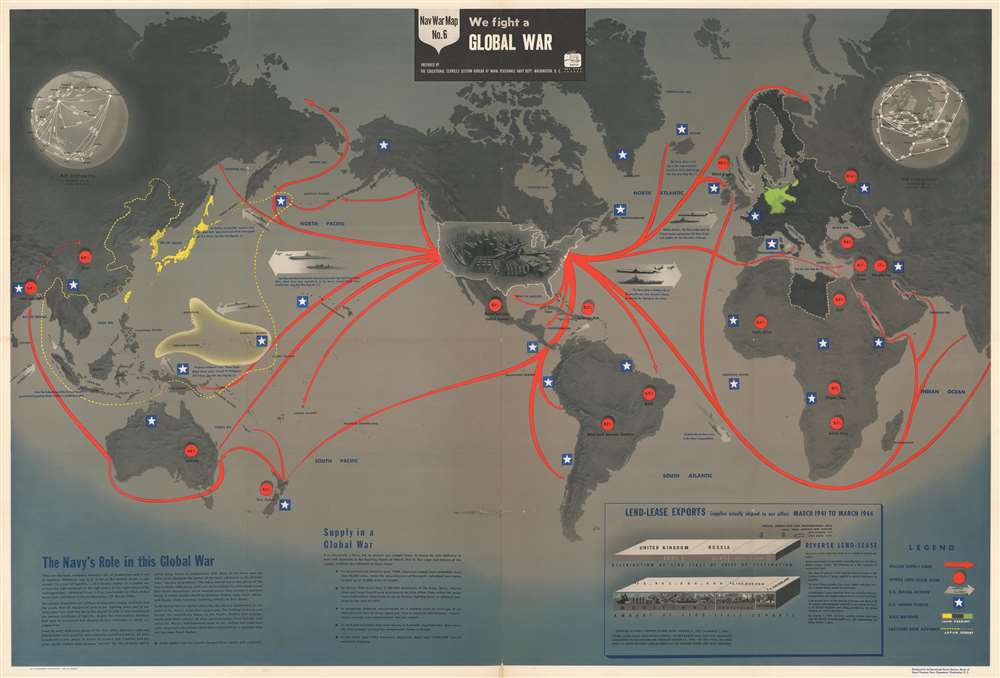
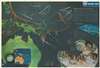
The last map in the series, NavWarMap No. 6 is the only world map in the set and traces the global reach of the U.S. Navy. Bright red arrows highlight American supply lines from the United States throughout the rest of the world. White stars inscribed in blue squares mark areas where American armed forces are stationed or fighting, including northern France, indicating that this map was published after the June 6, 1944 D-Day landings in Normandy. Other illustrations highlight American naval might in the Atlantic and Pacific and promote the Navy's many successes in keeping the enemy from reaching the continental United States.A Global War of Logistics
An aspect of the war that is often overlooked in hindsight is the truly herculean feat of supplying millions of soldiers deployed throughout the world. As stated in the text in the bottom left corner, U.S. supply lines stretched 56,000 miles, or more than twice the circumference of the Earth. The amount of supplies needed to sustain a single solder for a month was measured in tons of cargo space per man per month. Not only was it essential that these supplies get where they were going, but they also needed to get to their destination safely, so the convoys also needed to be protected, which added to the logistical challenge presented to the U.S. military.Lend-Lease
As is emphasized by the visual display of American manufacturing ability by the mountains of supplies drawn within the U.S., is the fact that the United States was, at this time, one of the few industrialized nations that had not been completely destroyed by the war. In fact, American industry had not been affected by the fighting and continued to increase its output continuously following the Declaration of War. This allowed the United States to support its allies through a program called Lend-Lease, which sent much-needed supplies to America's allies worldwide. A graphic situated in the lower right quadrant details in broad terms where these supplies were sent and what kinds of supplies were provided.
Publication History and Census
These maps were created by the Bureau of Naval Personnel, most likely by the training division, and distributed by the Educational Services Section. The maps of the NavWarMap series were created both to inform, but also to motivate, Allied soldier, sailors, and airmen. No OCLC references exist for the individual maps. One OCLC entry catalogues nine institutions that possess the entire set: Franklin and Marshall College, the Ohio State University, the University of Michigan, the University of Wisconsin, the Wisconsin Historical Society, the University of Florida, Idaho State University, the National Library of Australia, and Monash University in Clayton, Australia.Condition
Good. Every sheet except NavWarMap No. 3 exhibits areas of infill. Verso repairs to fold separations. All six sheets are blank on verso.
References
OCLC 53073135.