
1918 Yıldırım Ordular Grubu Secret Ottoman Map of the Levant, World War I

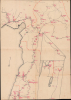
يلديرم اردولر غروپى نزد مؤسسه مؤسسات صحيه و حيوانيهسى مشروحدور / [The medical and veterinary institutions and establishments attached to the Yıldırım Army Group are detailed here].
Ottoman Preparations for the 'Last Stand' in the Levant.
- Digital Map Information
- Suitable for large format printing
- Full resolution TIFF file
- ICC color profile embedded
- Delivered instantly via download link
Ottoman Preparations for the 'Last Stand' in the Levant.
This is a rare and likely unique c. 1918 large-format Ottoman military resource map of the Levant prepared by the Yıldırım Orduları Grubu (Lightning Armies Group), the elite field command established to halt the advancing British Empire and its Arab allies during the final stages of World War I (1914-1918). Combining printed cartography with handstamps and manuscript annotations, the map inventories the region's strategic infrastructure, emphasizing hospitals, medical depots, supply centers, transportation networks, and other critical military resources essential to sustaining Ottoman operations. Intended for high-level logistical planning rather than tactical battlefield use, such a comprehensive assessment of military assets would have been among the Ottoman Empire's most closely guarded wartime documents, offering an extraordinary glimpse into the administrative and logistical foundations of the Palestine Campaign.A Closer Look
The sheet consists of a main map and two insets, all built upon the template of a skeletal printed map which outlines basic topographical features, names key cities and towns, and details transportation routes, including the all-important railway infrastructure. The main map embraces the coastal Northern Levant and south-central Anatolia, from Adana in the north to Haifa and Dera'a in the south, taking in Damascus, Beirut, Tripoli, Homs, Aleppo, and Iskenderun. The inset in the lower right extends coverage southward to Ma'an (Jordan) and includes Jerusalem (قُدس), the Dead Sea, Amman, and Nablus. Above, the third inset, embraces eastern Syria, notably the Euphrates Valley, including Deir ez-Zor (ديرزور), the administrative center of the Sanjak of Zor.Overlaying the black map template are a series of red handstamps and manuscript additions (place names), perhaps added in Damascus, for the Yıldırım ('Thunderbolt') Army Group high command. First, the dashed lines and numbering in orange crayon divide the region into five military zones. However, the dominant feature of the map is the copious clusters of red handstamps placed at virtually every major city and town, representing numerous different symbols for the locations of Ottoman army hospitals and veterinary clinics (for cavalry), as well as the locations of barracks, troop placements, munitions, supplies, post offices, telegraph offices, mechanics' garages, petroleum depots, and more. The map's emphasis on medical and veterinary services is a feature not often seen on military maps, even though these were always necessary factors in maintaining military success. Featuring highly sensitive, secret information, the map was clearly designed to have been hung on the walls of an Ottoman Army headquarters for strategic consultation by senior officers.
Context of the Map's Production
This map was made in the spring or summer of 1918, just in advance of the Ottomans' 'last stand' in World War I, and was created for the high command of the Yıldırım Army Group, a recently formed elite Ottoman-German force. While the map is undated, its place in the chronology of the war can be determined by the red handstamped details on it. First, the map shows the Ottoman positions as extending in Palestine only as far south as the Judean Hills. This indicates that the map postdated the British capture of Jerusalem in December 1917. Also, the map shows no Ottoman positions to the immediate north and east of Jerusalem, suggesting it dates from after March 1918, when the British gained control of that area. The concentration of Ottoman positions and the seeming 'line of control' indicates that the present map was made in the spring or summer of 1918, when the Ottoman-German and British positions in Palestine were deadlocked.Indeed, the Central Powers defensive positions in the Judean Hills were so formidable, that despite constant herculean efforts, the British were unable to progress for six months. The deadlock was only resolved by the momentous British victory at the Battle of Megiddo (September 19-25, 1918), the 'Breakthrough at Nablus,' after which the Entente forces (the British and their Arab allies) invaded Syria and Lebanon. This set the stage for the final act of World War I in the Levant, the 'Pursuit to Haritan,' after which the end of hostilities was declared on October 30, 1918.
Wider Historical Context
During World War I, the Levant and Egypt were considered to be strategically critical for both sides. Britain had to defend the Suez Canal, the lifeline of its empire, while Palestine, Lebanon, and Syria, mainly populated by Arabs who resented the sultan's rule, were seen to comprise the 'soft underbelly' of the Ottoman Empire, as well as providing the bridgehead between Turkey and the Hejaz, with the holy cities of Mecca and Medina. In this theater, British forces, headquartered in Cairo, assumed the form of the Egyptian Expeditionary Force (EEF). The Central Powers' side, headquartered in Damascus, was dominated by Ottoman troops, but had a mixed Turkish-German command structure. For much of the war, this force was dominated by the Ottoman Fourth Army, technically led by Djemal Pasha, one of the 'Young Turk' triumvirs. However, it was commanded in the field by the German Colonel Kress von Kressenstein.For the first two years of the war, the Ottoman-German side was generally on the offensive, terrifying the British by invading the Sinai and mounting two unsuccessful assaults upon the Suez Canal. However, in 1916, the British gradually improved their performance in Egypt. Meanwhile, the Arab Revolt (June 1916 - October 1918), in which forces loyal to the Sharif of Mecca, advised by 'Lawrence of Arabia', mounted an insurgency against the Ottomans in Hejaz and Transjordan, began to sap the Sublime Porte's strength and authority in the Arab World. By the beginning of 1917, the EEF had turned the tables, crossing into Palestine and, albeit with difficulty, taking Jerusalem in December of that year. In response, in June 1917, the Ottoman Yıldırım Army Group was formed, featuring well-armed crack troops led successively by the former Prussian War Minister, Field Marshal Eric von Falkenhayn, and the famed Gallipoli veterans, the German General Liman von Sanders and General Mustafa Kemal Pasha (the future 'Atatürk').
By early 1918, the EEF had lost its momentum and was compelled to send thousands of troops to the Western Front to counter a great German offensive. Despite valiant efforts, they became bogged down in the Judean Hills and, on two occasions, failed to open a new front by invading Transjordan in the spring of 1918. However, the Ottoman-German side was also worn down by the British attacks and began to suffer from supply shortages. The present map was made during the resulting stalemate period, in the spring or summer of 1918.
Publication History and Census
This map was prepped by and for the Yıldırım Orduları Grubu (Yıldırım Army Group; يلدرم اردولر غروبى) and, as explained above, was likely produced in early 1918. This map is unrecorded in institutional collections or in market history and is likely a unique survivor.Cartographer
Yıldırım Orduları Grubu (Yıldırım Army Group, يلدرم اردولر غروبى ; 1917 - 1918) was an elite Ottoman military unit that saw fighting in the Levant in the closing stages of the First World War. The Yıldırım (Thunderbolt) Army Group was established by the Ottoman High Command in June 1917, initially envisioned as a premier joint Ottoman-German strike force (known in Germany as Heeresgruppe F) tasked with recapturing Baghdad from the British. Commanded by the former German Chief of Staff, General Erich von Falkenhayn, the group mobilized the Ottoman 7th and 8th Armies alongside specialized German infantry and artillery units. However, before the Baghdad expedition could launch, a British offensive in Palestine caused the Yıldırım Army Group to be redeployed and charged with defensive fighting. Once deployed to Palestine, the group faced extreme difficulties, plagued by supply shortages, disease, and overextended lines. Following the loss of Jerusalem in December 1917, Falkenhayn was replaced by General Otto Liman von Sanders in early 1918. The final blow came in September 1918 at the decisive Battle of Megiddo, where Allied cavalry and air superiority completely shattered the Yıldırım defenses. In the chaotic aftermath, Mustafa Kemal Pasha (later Atatürk) took command of the remaining forces, executing a masterclass in rearguard strategy by successfully withdrawing the surviving troops north to Aleppo. There, they established a firm defensive line that held until the Armistice of Mudros brought an end to the Ottoman war effort in October 1918. Further Details...
Condition
Very good. Verso repair to a fold separation. Slight loss at a fold intersection.